Adam Jacobs

Fleet Week 2020 by Adam Jacobs

Fleet Week is one of the highlights of the year in San Francisco. Thousands gather along the shore to watch fantastic airshows, salute the military and of course, watch the infamous Blue Angels fly jaw-dropping formations across landmarks such as Alcatraz and the Golden Gate Bridge.

This year will be different though. The pandemic means there will be no planes, no crowds and no parades. Instead, Fleet Week has been taken virtual encouraging people to learn more about the aircraft, ships, vessels and other things usually showcased in person from the comfort of their home.

I’m usually commissioned to photograph the airshows. This year I’ve had fun digging through my archives and found this image which is one of my favorite shots from the last few years. Enjoy!

Blue Angels Flyover Golden Gate Bridge San Francisco Adam Jacobs Photography

Photographing for Four Seasons Hotels by Adam Jacobs

It’s always a pleasure to work for companies that I really respect and who have such a high eye for both detail and creativity.

Here are some commercial lifestyle and interior photographs that I was commissioned to create for The Four Seasons Hotels a few months ago which have just been released.

Adam Jacobs Photography Hotel Photography Four Seasons Interior Photography San Francisco Silicon Valley


Birthplace of Silicon Valley - Hewlett Packard by Adam Jacobs

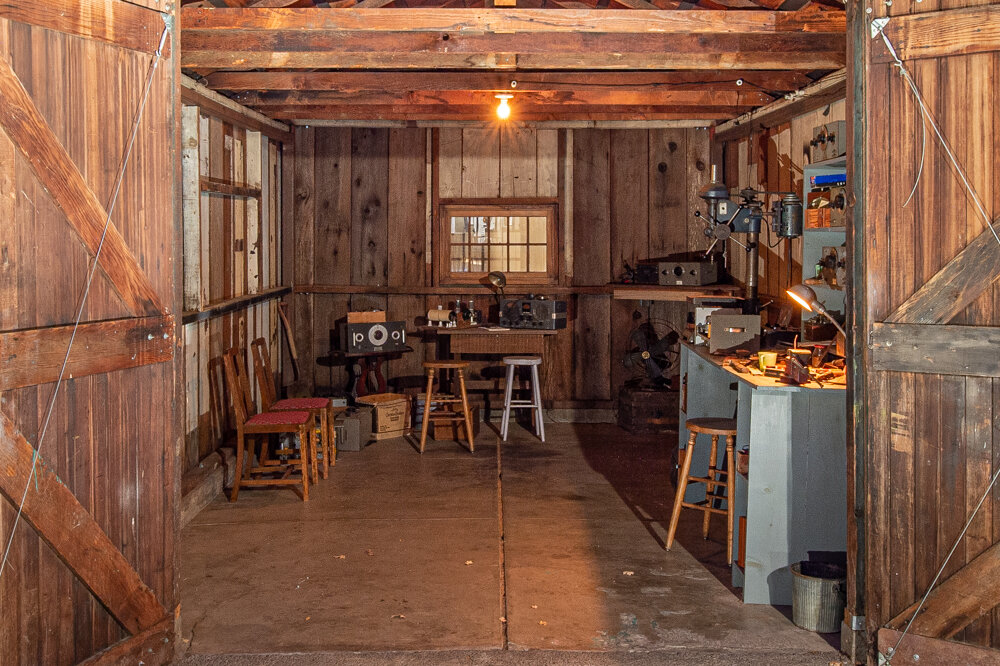
I just photographed what appears to be an inconspicuous garage in Palo Alto but, is in fact regarded as the ‘birthplace’ of Silicon Valley. For it is here, that the company Hewlett-Packard (HP) was invented.

HP Garage Silicon Valley_Adam Jacobs Photography Palo Alto 2
HP Garage Silicon Valley_Adam Jacobs Photography Palo Alto Historic Site 1

The garage sits in the garden at 367 Addison Avenue. It was built in 1905 and was originally occupied by Palo Alto’s first mayor Dr John Spence, his wife Ione and their two daughters in 1909. It was then divided into two separate apartments (numbers 367 and 369) in 1918.

HP Garage Silicon Valley_Adam Jacobs Photography Palo Alto 3

During this time, William “Bill” Hewlett and David “Dave” Packard both attended nearby Stanford University and in 1937 had their first business meeting. The then Dean of Engineering Frederick Terman encouraged them to establish an electronics company in the local area rather than leaving California.

Therefore, in 1938 Dave Packard moved into the first-floor three room apartment a 337 Addison Avenue with his newlywed Lucille with Bill Hewlett sleeping in the shed. A now widowed, Mrs Spencer moved into the second floor apartment.

Dave and Bill formed a partnership and began using the one-car garage with jus $538 in start up capital and in 1939 flipped a coin to decide whose name would precede the other for the company. Thus, Hewlett, Packard was born.

The company’s first product which you can still see a replica of today was an audio oscillator, known as the HP200. Interestingly, one of their first customers was the Walt Disney Company who purchased eight of these oscillators to test the sound systems in theaters running the iconic film Fantasia. This was the first major movie to be shown in stereophonic sound.

HP Garage Silicon Valley_Adam Jacobs Photography Palo Alto 4

The garage and house have been replicated to show exactly how they looked at the time when Bill and Dave worked there and although closed to the public you can view it from the sidewalk. Tours are also available which I would highly recommend to technology and history buffs.

HP Garage Silicon Valley_Adam Jacobs Photography_2

Having the garage all to myself to photograph is one of those unique experiences that I am often fortunate and privileged to have as a photographer!

HP Garage Silicon Valley_Adam Jacobs Photography Palo Alto 6


My photo as a Billboard outside SFMOMA by Adam Jacobs

As a photographer nothing quite beats seeing your work in print rather than just on screens.

I was therefore really excited to collaborate with the San Francisco Museum of Art (SFMOMA), one of the worlds largest museums of contemporary art, on a campaign to create a photograph that was made into a giant billboard to market the museum. The photograph shows their amazing outdoor rooftop sculpture at dusk bustling with visitors.

The billboard has been printed in downtown San Francisco and is located right outside the entrance of the museum.

Here are some photos I took as I was walking past last week.

Adam Jacobs SF MOMA Billboard Commercial Photography Fine Art

Yosemite Valley - Channeling My Inner Ansel by Adam Jacobs

During my photography workshops, I often refer to the work of one of the masters of landscape photography Ansel Adams to showcase how the power of great composition, being patient and understanding the fundamentals of light are crucial in creating great photographs. Much of his work was shot in Yosemite National Park in California.

I just spent Memorial Day weekend in the park photographing where there has been a recent spell of wetter than normal weather. This meant that the waterfalls were flowing stronger than normal, the Merced river was full of fast flowing water and the trees were lush, verdant and green - great conditions for photography. Unusually, for late May there was even a freak snow storm which blanketed much of the park, clearing out most of the crowds and leaving me to explore many new areas without having to deal with traffic or people in my shots (which can often be the case at this time of year).

Below are some of my favorite shots as I channeled my inner Ansel. Do you prefer the color or black and whites?

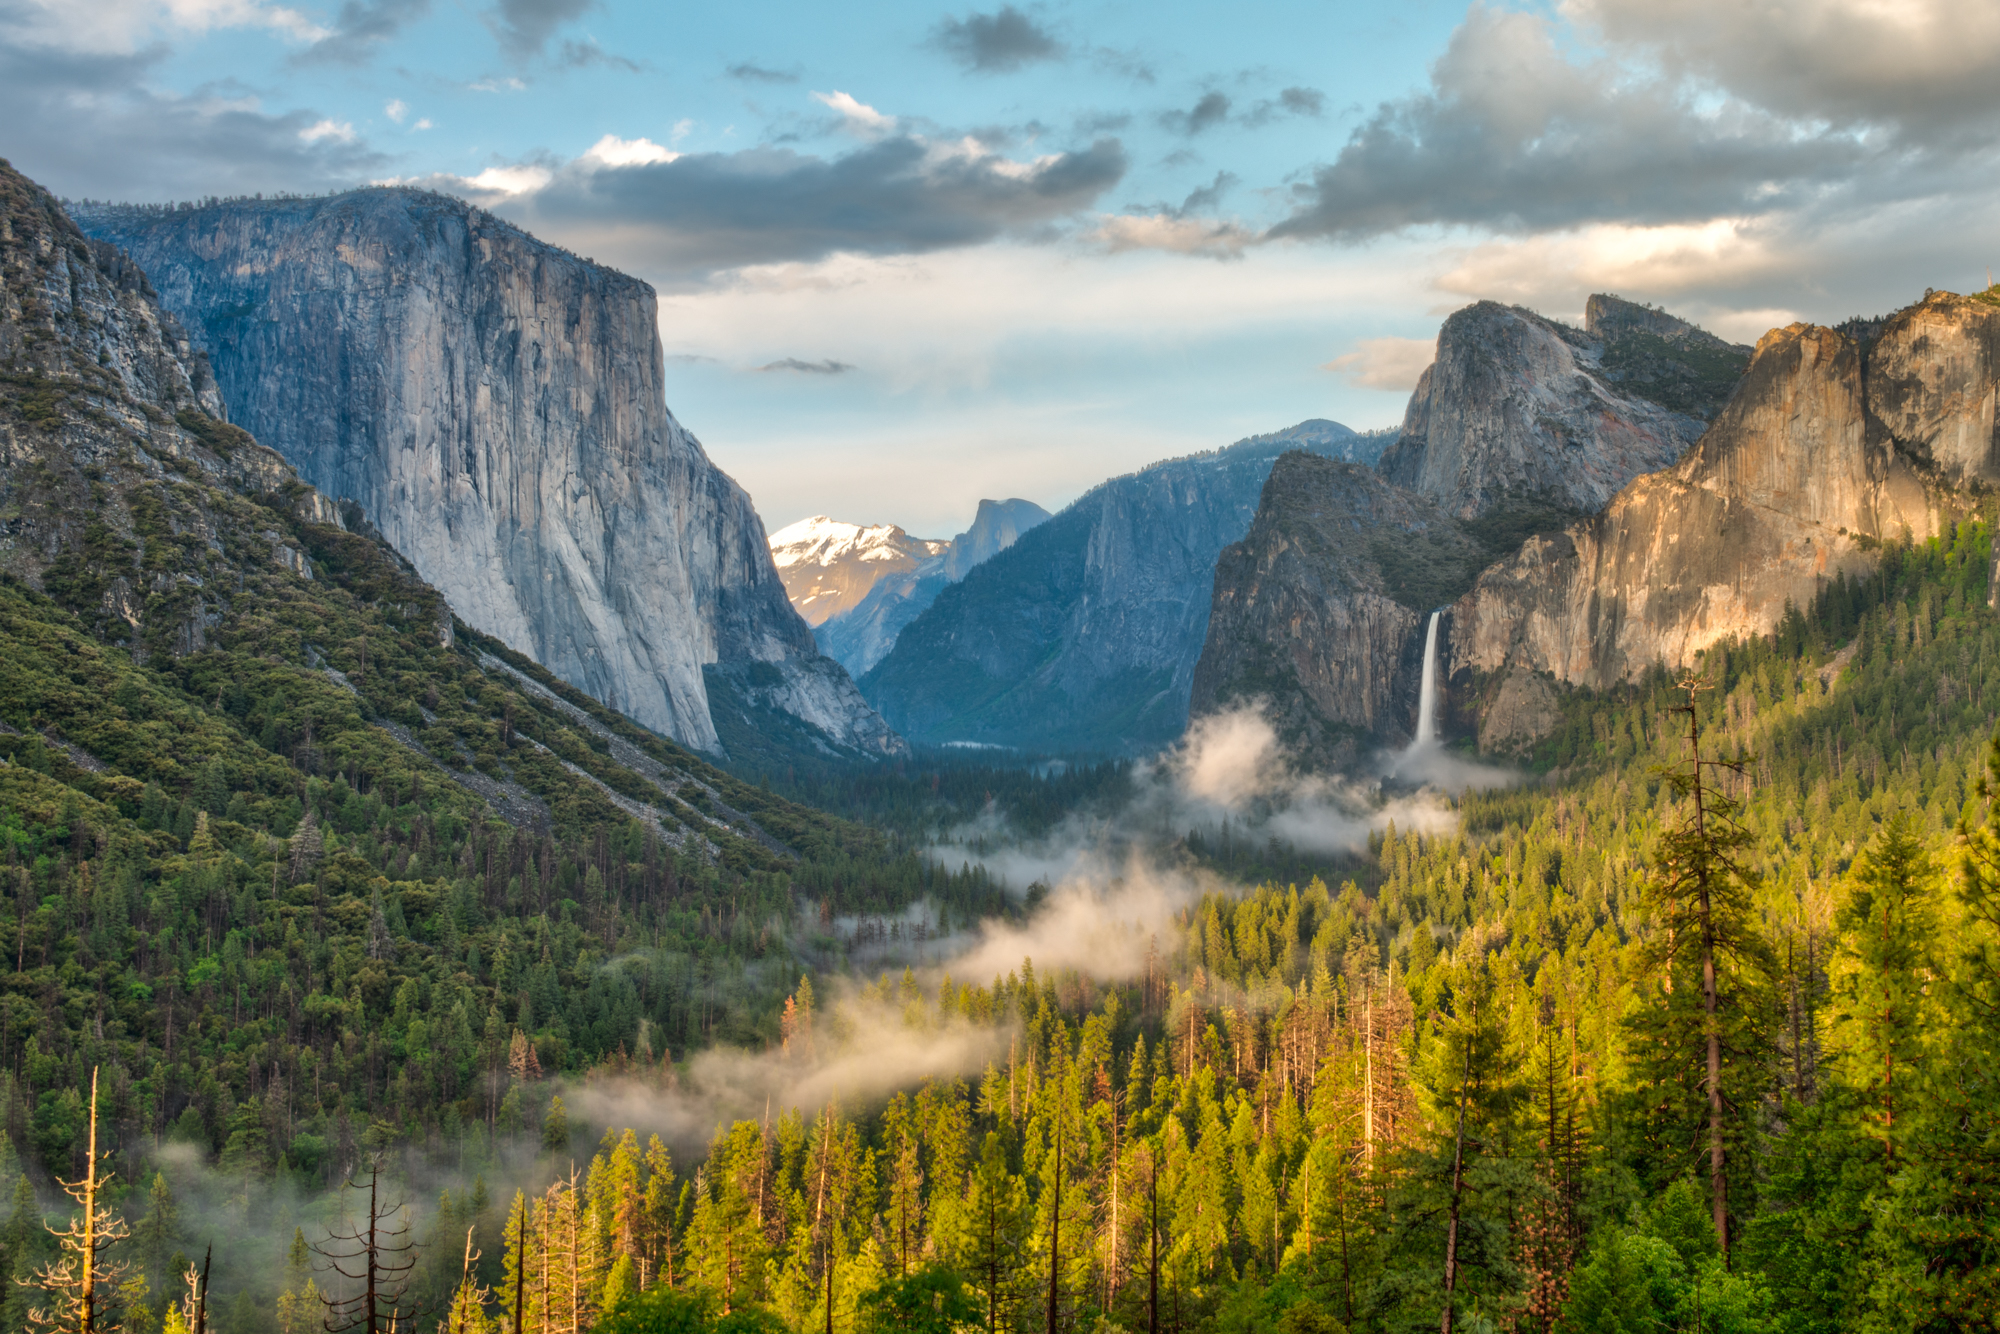
After visiting this spot so many times, this was one the best times I’ve seen the light falling so perfectly on El Capitan on the left and Bridal Falls on the right. I also love the big booming clouds and how you can see Half Dome in the background …

After visiting this spot so many times, this was one the best times I’ve seen the light falling so perfectly on El Capitan on the left and Bridal Falls on the right. I also love the big booming clouds and how you can see Half Dome in the background with a little covering of snow. There is a reason this spot is known as Inspiration Point!! This photo is going to look awesome printed out huge.

Color version of the above…which do you prefer?

Color version of the above…which do you prefer?

Another view from Tunnel Point/Inspiration Point taken late at night as low fog settled over the valley creating a perfect leading line to Bridal Falls.

Another view from Tunnel Point/Inspiration Point taken late at night as low fog settled over the valley creating a perfect leading line to Bridal Falls.

Color Version of the above

Color Version of the above

My neutral density filters always come in useful on trips to National Parks. This was taken with a 6f stop ND filter to give the fast flowing water (pretty unusual for this time of year) a soft, silky appearance. I got some wet feet but it was defin…

My neutral density filters always come in useful on trips to National Parks. This was taken with a 6f stop ND filter to give the fast flowing water (pretty unusual for this time of year) a soft, silky appearance. I got some wet feet but it was definitely worth it for this shot!

Tips for Aerial Photography - San Francisco by Adam Jacobs

I recently flew in a ‘no doors’ helicopter above San Francisco whilst being filmed for a documentary focusing on my career. Wow, what an amazing experience! I’ve been fortunate enough to previously fly over both New York and Miami . However, cruising over the Bay Area on a perfectly clear day was a totally different experience; completely breathtaking and made for some stunning photo opportunities. I can’t wait to add this city to my fine-art Urban Symmetry series which recently was shown in New York and Germany.

In the meantime, given that I’ve now photographed quite a few times out of helicopters, I thought I’d put together some of my top tricks and tips for anyone who is planning on taking their camera and shooting in the skies out of a chopper. Enjoy!

Adam Jacobs Aerial Helicopter San Francisco Photography 1
Always look fo unique oblique angles when shooting out of helicopters. Here’s the Salesforce Tower looking South all the way to Twin peaks.

Always look fo unique oblique angles when shooting out of helicopters. Here’s the Salesforce Tower looking South all the way to Twin peaks.

Research and Prepare

Photographing from a helicopter takes preparation, planning and research therefore organization beforehand is crucial. Space inside a helicopter is incredibly limited so you want to take as little as gear as possible to mean you can concentrate on shooting and enjoying the flight. I would also advise taking the minimum amount of accessories when as it is unlikely you will have an opportunity to change memory cards or fish around your bag for filters or other accessories; the last thing you want is a lens hood falling off and hitting someone on the head…that’s a serious law suit on your hands!!

I would actually advise removing all hoods off your lenses before flying and leaving them on the ground. I also would take the largest capacity memory cards you have to mean you don’t have to change them when in the air; I loaded my two bodies with two 64gb high speed Lexar Compact Flash Cards. Additionally, changing lenses during flight without introducing dust into your sensor with the wind swirling around is virtually impossible. Meanwhile, the strength of the wind generated by the rotors, means even if you tried to change lens there is a good chance of it falling out and you never seeing it again.

Also, have a think if possible of what you want to capture before taking flight. I had carefully thought out a shot list before setting out considering what I wanted to capture as well as the position of the sun, angle of the light and where I would need the helicopter to be positioned to get the perfect shots. Fortunately, I was working with a fantastic pilot, John from Bay Aerial Photo, who really understood my vision and was able to get me into the ideal spots. Communication with the pilot is also really important. They will have flown these routes hundreds of times before and will be able to get you in the right positions to get your shot.

What gear to take?

To ensure that you don’t need to switch lenses at any point, I recommend bringing two cameras if you can. I flew with the Nikon D850 and D800 securely attached to my torso with my trusty Black Rapid straps and a GOPRO 4 strapped to my chest for behind the scenes video and my Manfrotto Sling Bag tucked into a small compartment and tethered to the front passenger seat should I need any miscellaneous gear in an emergency. I was fully harnessed to the helicopter both on the frame and the floor before take off, meaning that I could virtually step out of the doors as I increasingly gained confidence and shoot directly down onto the city before and avoid getting the skid in the shot.

Shooting the Golden Gate with a 24-70 lens! Notice that I’m wearing a beanie and thick jacket… It’s often much chillier when up in a helicopter.

Shooting the Golden Gate with a 24-70 lens! Notice that I’m wearing a beanie and thick jacket… It’s often much chillier when up in a helicopter.

You want to make sure that all your gear is secure and fastened down before take off as helicopters can move around a lot; you do not want things rolling around the chopper or even worse falling out. Everything needs to be clipped to the helicopter or me at all times with no exceptions. Even a pair of sunglasses falling off could become a dangerous projectile if falling off over San Francisco. Therefore, tethering all of my bodies using a variety of different clamps and cords was vitally important to ensure that everything was secure and safe. As I was flying with just two bodies and knew that I would not be able to regularly and easily switch lenses, lens choice was crucial to maximize my time in the sky.

I knew I wanted to try and capture the city with wider, abstract angles as opposed to tight crops so opted to take up my Nikon 24-70mm 2.8 on my D800 and my Nikon 14-24mm on my D4. In truth, I ended up shooting 95% of the shots with the D800 as it soon became obvious that the 14-24mm was a little too wide. I was constantly capturing both the rotors of the chopper and the skid, that part of the helicopter on which it rests on the ground or where you can rest your feet. With the 14-24mm it also soon became apparent that blurry rotor blades were creeping into my frame thus ruining an otherwise perfect sunset or moody sky. Knowing this will save you a lot of time and frustration in post-production once you’re back on the ground. Occasionally, it was quite nice to use the wider lens and capture the helicopter in the shot in order to contextualize the shot and it was also useful for behind the scenes.

However, I was definitely more comfortable with the versatility and focal length that the 24-70mm offered me and ended up using this lens for the majority of the time. I would love to fly another time with a 70-200mm to capture some more tight photographs where I could pick up some more on details of buildings and elements of landscapes but I was very content with the images captured with the 24mm-70mm and would recommend this as a good focal length for your aerial photography adventure.

A beautiful, clear day in San Francisco made for the perfect conditions for an aerial photograph of the Golden Gate Bridge with Marin, Tiburon, Salsultio in the background. The versatility of using a 24-70mm lens gave me the otpion to either come in…

A beautiful, clear day in San Francisco made for the perfect conditions for an aerial photograph of the Golden Gate Bridge with Marin, Tiburon, Salsultio in the background. The versatility of using a 24-70mm lens gave me the otpion to either come in tight or get the whole bridge in the frame as with this shot.

Looking straight down on the South Tower of the Golden Gate Bridge in San Francisco as a boat passes through the Bay.

Looking straight down on the South Tower of the Golden Gate Bridge in San Francisco as a boat passes through the Bay.

Camera Settings: Beware of Vibrations

In terms of camera settings, given my familiarity with my cameras I always shoot on manual but, always considered shutter speed as my main priority. There is a huge amount of motion and vibration inside the heli with constant vibrations and shaking all potentially causing your photographs to be soft. Subsequently, a general good rule to follow during the day is that you double your focal length in terms of shutter speed. By this I mean, that if you are using a focal length of 500m you should be shooting at 1/1000sec or faster. In practice though if you don’t have a large lens, I would ideally (obviously dependent on light conditions) still try to shoot with a shutter speed of 1/1250 or higher if possible. I did have to drop mine down much lower when shooting at night and push up my ISO but ideally you want to keep that shutter speed fast to keep your photographs free of motion blur. Luckily, with the advancement in CMOS sensors, you are now able to shoot on the high-end cameras at 3200 or 6400 with relatively clean images making shooting at dusk or night much easier than a few years ago where it would have been near on impossible. I find with my D800 that I can get relatively clean shots close to 3000 so pushing my ISO was not too much of a concern for me. I would rather have slightly noisy photographs than soft ones where I can do nothing with them in postproduction.

Also, avoid leaning on the side of the chopper for stabilization; remember it is constantly moving and vibrating. Therefore, it is not providing a sturdy support and will merely server to create more blur in your images. Another helpful tip is to lean forward so that your back is not in contact with your seat back if you are not sitting on the floor of the chopper as a lot of vibration transfers through the seat back to your body and therefore camera. Remember, the longer focal length you use will obviously also require a faster shutter speed especially if you start poking it out the chopper due to the swirling winds.

An aerial photograph of the San Francisco financial district including the SalesForce Tower, Transamerica Building and Bay Bridge taken in March 2019. A fast shutter speed and leaning slightly out of the helicopter ensured that this image remained t…

An aerial photograph of the San Francisco financial district including the SalesForce Tower, Transamerica Building and Bay Bridge taken in March 2019. A fast shutter speed and leaning slightly out of the helicopter ensured that this image remained totally sharp.

Since I was shooting RAW files the whole time I kept my white balance on Auto and use the highly reliable AF-S on the Nikons switching from single to multiple focus points depending on what I photographing. Further, in terms of aperture I generally varied between f/5.6 to f/11 depending on the light available and the subject I was shooting. In New York it was a daytime shoot and despite it being overcast I was able to use a higher aperture than in Miami where less ambient light meant I had to close up my aperture out of necessity.

I also chose to use manual ISO, which gave me greater control. On my first flight experiment, I did experiment a little with the Auto ISO feature but found that a lot of my images were coming out under exposed so quickly switched to manually control the ISO. My flight was in the mid afternoon so I was constantly changing my position in relation to the lower lying sun. Therefore, personally I preferred being able to quickly adjust my ISO to achieve the optimal exposure.

Being able to quickly change the camera settings manually allows you to cope with tricky lighting situations such as this aerial photo. The sun was facing directly towards me and I had to adjust ISO and aperture to compensate and get the look I want…

Being able to quickly change the camera settings manually allows you to cope with tricky lighting situations such as this aerial photo. The sun was facing directly towards me and I had to adjust ISO and aperture to compensate and get the look I wanted, to feature Coit Tower looking all the way out to the Golden Gate Bridge.

Enjoy it

Make the most of being in the air and shoot constantly. I would recommend putting your camera on burst mode or even better bracketing exposures if lighting conditions are variable to ensure that you get the correct exposure. It is not often that you will have the chance to be in such a unique and fortunate position so I would take every opportunity to capture as many frames as you can; you can always delete them when you get home if you have too many but you won’t be able to go back up and take more photos unless you just happen to have a helicopter on tap – some of us can only dream!

It is not everyday that one gets to go up in a helicopter so make the most of it. Obviously you will be primarily there to take pictures but don’t forget to take the time to lower your camera occasionally and give yourself a few moments to admire how different things look from high up and overall have fun making some fantastic photographs.

Asking my pilot to position the helicopter lower enabled me to get this unique shot of Alcatraz in the foreground with the entire San Francisco city skyline perfectly composed behind it.

Asking my pilot to position the helicopter lower enabled me to get this unique shot of Alcatraz in the foreground with the entire San Francisco city skyline perfectly composed behind it.

Don’t be afraid to experiment with focal lengths and go tighter to capture different types of images.

Don’t be afraid to experiment with focal lengths and go tighter to capture different types of images.